
As you know, instructions are those step-by-step explanations of how to do something: how to build, operate, repair, or maintain different items. When you finish this section you will be able to:
- Analyze and evaluate a set of technical instructions
- Write clear and accurate instructions with an introduction and conclusion
- Develop and design an instruction manual for a specific audience
For something seemingly so easy and intuitive, instructions are some of the worst-written documents. Like me, you’ve probably had many infuriating experiences with badly written instructions. What follows in this chapter may not be a fool-proof, goof-proof guide to writing instructions, but it will show you what professionals consider the best techniques.
Ultimately, good instruction writing requires:
- Clear, concise writing
- A thorough understanding of the procedure in all its technical detail
- Your ability to put yourself in the place of the reader, the person trying to use your instructions
- Your ability to visualize the procedure in great detail and to capture that awareness on paper
- Your willingness to go that extra distance and test your instructions on the kind of person you wrote them for.
By now, you’ve studied headings, lists, and special notices—so writing a set of instructions with these tools probably seems obvious. Just break the discussion out into numbered vertical lists and throw in some special notices at the obvious points and you’re done! Well, not quite, but that’s a great start. This chapter explores some of the features of instructions that can make them more complex and effective, so you can use these considerations to plan your own instructions.
Some Preliminaries
At the beginning of a project to write instructions, it’s important to determine the structure or characteristics of the particular procedure you are going to write about. In technical instructions, your understanding of the procedure could make the difference between success and failure, or at more complex levels, life and death.
Early in the process, define the audience and situation of your instructions. Remember that defining an audience means defining its level of familiarity with the topic as well as other details, including age and ability level. Writing instructions for a child will require a different focus on details and images than instructions for an adult.
If you are in a writing course, you may need to write a description of your audience and attach that to your instructions. This will enable your instructor to assess your instructions in terms of their appropriateness for the intended audience. And remember that in a technical-writing course, it is preferable to write for non-specialist audiences, which is more challenging to you as a writer.
Next, examine the procedure you are describing to determine the number of tasks. How many tasks are there in the procedure you are writing about? Let’s use the term procedure to refer to the whole set of activities your instructions are intended to discuss. A task is a semi-independent group of actions within the procedure: for example, setting the clock on a microwave oven is one task in the big overall procedure of operating a microwave oven.
A simple procedure like changing the oil in a car contains only one task; there are no semi-independent groupings of activities. Within that task are a number of steps, such as removing the plug, draining the old oil, replacing the filter, and adding the new oil. If you were writing instructions on maintaining your car yourself to save money, you would have several tasks, some which are independent, such as rotating the tires, checking the fluids, or replacing the windshield wiper blades.
A complex procedure like using a microwave oven is another example of a procedure that contains plenty of such semi-independent tasks: setting the clock; setting the power level; using the timer; and cleaning and maintaining the microwave.
There may be more to your instructions than just tasks. Some instructions have only a single task, but have many steps within that single task. For example, imagine a set of instructions for assembling a kids’ swing set. In my own experience, there were more than 130 steps! That can be a bit daunting. A good approach is to group similar and related steps into phases, and start renumbering the steps at each new phase. A phase then is a group of similar steps within a single-task procedure. In the swing-set example, setting up the frame would be a phase; anchoring the frame in the ground would be another; assembling the box swing would be still another.
Another consideration, which you may be unable to determine early on, is how to focus your instructions. For most instructions, you can focus on tasks, or you can focus on tools (or features of tools). Your approach will depend on your overall objective in writing the instructions, and you will find that the task approach is one you will probably use most often, with the discussion of the tools included in notes or supplementary sections like a glossary.
In a task approach (also known as task orientation) to instructions on using a phone-answering service, you’d have these sections:
- recording your greeting
- playing back your messages
- saving your messages
- forwarding your messages
- deleting your messages, and so on
These are tasks—the typical actions we’d want to do with the machine. On the other hand, in a tools approach to instructions on using a photocopier, there would be these unlikely sections:
- copy button
- cancel button
- enlarge/reduce button
- collate/staple button
- copy-size button, and so on
If you designed a set of instructions on this plan, you’d write steps for using each button or feature of the photocopier. Instructions using this approach are hard to make work. Sometimes, the name of the button doesn’t quite match the task it is associated with; sometimes you have to use more than just the one button to accomplish the task. Still, there can be times when the tools/feature approach may be preferable.
Finally, you have to decide how your are going to group tasks if there are more than one. Simply listing tasks may not be all that you need to do. There may be so many tasks that you must group them so that readers can find individual ones more easily. For example, the following are common task groupings in instructions:
- unpacking and setup tasks
- installing and customizing tasks
- completing basic operating tasks
- handling routine maintenance tasks
- troubleshooting tasks; and so on
Writing Style
The way you actually write instructions, sentence by sentence, may seem contradictory to what previous writing classes have taught you. However, notice how “real-world” instructions are written—they use imperative (command, or direct-address) kinds of writing; they use a lot of “you,” and that is entirely appropriate. You want to attain your reader’s full attention. For that reason, instruction-style sentences sound like these: ” Press the Pause button on the front panel to stop the display temporarily” and a clarifying note might read “You should be careful not to …”
If your instructions have to be more formal, ask your teacher about preferences for using “you.” You may find that the direct address isn’t appropriate for certain contexts.
For the most effective instructions, begin each step with an action verb!
Never use the passive voice in instructions. For some weird reason, some instructions sound like this: “The Pause button should be depressed in order to stop the display temporarily.” Not only are we worried about the Pause button’s mental health, but we wonder who’s supposed to depress the thing (are you talkin’ to me?). Or consider this example: “The Timer button is then set to 3:00.” Again, as the person following these instructions, you might miss this; you might think it is simply a reference to some existing state, or you might wonder, “Are they talking to me?” Almost as bad is using the third person: “The user should then press the Pause button.” Again, it’s the old double-take: you look around the room and wonder, “Who me?”
“Another of the typical problems with writing style in instructions is that people seem to want to leave out articles: “Press Pause button on front panel to stop display of information temporarily” or “Earthperson, please provide address of nearest pizza restaurant.” Why do we do this? Do we all secretly want to be robots? Anyway, be sure to include all articles (a, an, the) and other such words that we’d normally use in instructions.
Conclusion. Generally, you don’t want to end your instructions with the last step. A conclusion ties the process up neatly, offers trouble-shooting information (i.e. what to do if something went wrong) and if you are writing the instructions as part of your work responsibility, they should include contact information.
Other Back Matter. Your set of instructions may include a list of references, a glossary or appendix, an index, or technical specifications. Items placed here are important to the overall instructions because they provide additional information that certain audiences may need, but that are not critical to understanding how to complete the procedure.
Adapted from McMurray, David and Arnett, Jonathan, “7. Writing Instructions” (2016). Sexy Technical Communications. 7. https://digitalcommons.kennesaw.edu/oertechcomm/7
Common Components of Instructions
Instructions are used frequently in day to day life. You may use written instructions provided at work to follow a procedure or you may watch a YouTube video that provides instructions on how to increase your computer’s speed. In this course, you will be asked to complete an assignment that requires you to write instructions for your peers to perform a particular task, so understanding the guidelines for writing clear, accurate, and informational instructions is the first step. The textbook Technical Writing introduces the most common components of instructions.
Title
Keep it simple but clearly identify the task that will be performed. Use a “how to” or gerund (ing verb) when crafting it. Make sure the title adequately reflects the product and process users will be working on. It should be simple and clear.
Introduction
The goal of the introduction is to give general information about the process. What is it? Why should it be done? The introduction is an overview of the process and why it is important. Oftentimes, the writer lists the benefits of completing the process so that the reader feels good about the task he or she is about to complete.
Tools & Materials
List the items necessary to complete the task so that the reader can gather and organize them before starting the process. Consider using a bulleted list or some other formatting tool so that it is easy for the reader to skim through.
Visuals
Your reader will need visuals to refer to and act as a guide through the process. Remember to label the visuals as Figure 1, Figure 2, and so on, and then title each visual so the reader knows what they are looking at. Generally, the visual is referred to within the step-by-step part of the instructions.
Step-By-Step Instructions
Use a numbered list of step-by-step instructions for completing the process. Consider transitional words to keep the reader on track. Examples of transitions include: first, next, then, and finally. Also, write in clear and complete sentences throughout this section. In addition, refer to the visuals in this section. For example, a writer might include a phrase such as: “See Figure 3.” This will help the reader see the relationship between the steps and the visual.
Another reminder is to be consistent with how you create instructions. If it is appropriate to use the word “you” as you write, use it consistently. Avoid shifting back and forth between second person and an imperative tone. For example, some audiences may prefer imperative statements, so instead of writing “You then push the blue button” write “Next, push the blue button.”
One last reminder is to explain to the reader why to do or not do something that may have negative consequences. This will help the reader have a positive experience completing the process.
Troubleshooting
A troubleshooting section helps the reader solve common problems. It is when someone tells the user to do something and adds, “If that doesn’t work, try this…” Sometimes, telling the reader what not to do is just as important as stating what to do. If you have several troubleshooting tips, organize this section so the reader can easily find the particular difficulty he or she needs solving at the moment. Therefore, make this section reader friendly and skimmable.
Conclusion
End the instructions with positive comments about the product and/or the process the user just completed. Sometimes there is a phone number for a Help Line if further assistance is needed. The benefits can also be restated but in different words; however, make sure not to use the exact words from the introduction. Readers don’t like to read the same exact words/phrases/sentences in the conclusion as they did in the introduction because it feels like the writer was too lazy to actually work on the document.
Other Back Matter
Your set of instructions may include a list of references, a glossary or appendix, an index, or technical specifications. Items placed here are important to the overall instructions because they provide additional information that certain audiences may need, but are not critical to understanding how to complete the procedure.
Warnings
Just because this is listed last in this section does not mean it is any less important than the other parts of the document or that it must be placed last in the document. In fact, the writer has to decide where in the document to put the warnings; most often, warnings should be dispersed throughout the document. Also, consider the legal and ethical obligations you have to the reader. It is the writer’s job to protect the reader from harm or damage, so any set of instructions needs a careful balance of warnings strategically placed throughout the document. If the writer overuses them, there is a risk of scaring the user or making it so that the reader doesn’t want to carry out the process being described in the instructions. If the writer under-uses warnings, there is a risk of someone getting injured.
In addition, you don’t want create instructions where the user has already completed the process and injured him/herself before the warning comes. Ultimately, it is the responsibility of the technical writer or technical writing team to keep the reader safe. In fact, there are standard precautionary statements that are color-coded and used for danger, warnings, cautions, and notes or notices.
Writing Steps
Discussion of the steps. When you begin the actual writing of the steps, there are several concepts to keep in mind: (1) the structure and format of those steps, (2) supplementary information that might be needed, and (3) the point of view and general writing style.
Structure and format. Normally, we imagine a set of instructions as being formatted as vertical numbered lists. And most are in fact. Normally, you format your actual step-by-step instructions this way. There are some variations, however, as well as some other considerations:
- Fixed-order steps are steps that must be performed in the order presented. For example, if you are changing the oil in a car, draining the oil is a step that must come before introducing new oil. These are numbered lists (usually, vertical and numbered lists). When in doubt, structure your instructions in this format. You may then use notes to indicate if there is any leeway to perform the steps in another sequence.
- Variable-order steps are steps that can be performed in practically any order. Good examples are those troubleshooting guides that tell you to check this or that where you are trying to fix something. You can do these kinds of steps in practically any order. With this type, the bulleted list is the appropriate format.
- Alternate steps are those in which two or more ways to accomplish the same goal are presented. Alternate steps are also used when various conditions might exist. Use bulleted lists with this type, with OR inserted between the alternatives, or the lead-in indicating that alternatives are about to be presented.
- Nested steps. In some cases, individual steps within a procedure can be rather complex in their own right and need to be broken down into substeps. In this case, you indent further and sequence the substeps as a, b, c, and so on.
- “Stepless” instructions. And finally some instructions really cannot use numbered and vertical lists because they do little, if any, straightforward instructional-style directing of the reader. Some situations must be so generalized or variable that steps cannot be stated.
Supplementary discussion
- Often, it is not enough simply to tell readers to do this or that. They need additional explanatory information such as how the task should look before and after the step; why they should care about doing this step; what mechanical principle is behind what they are doing; even more micro-level explanation of the step—discussion of the specific actions that make up the step.
- The problem with supplementary discussion, however, is that it can hide the actual step. You want the actual step—the specific actions the reader is to take—to stand out. You don’t want it all buried in a heap of words.
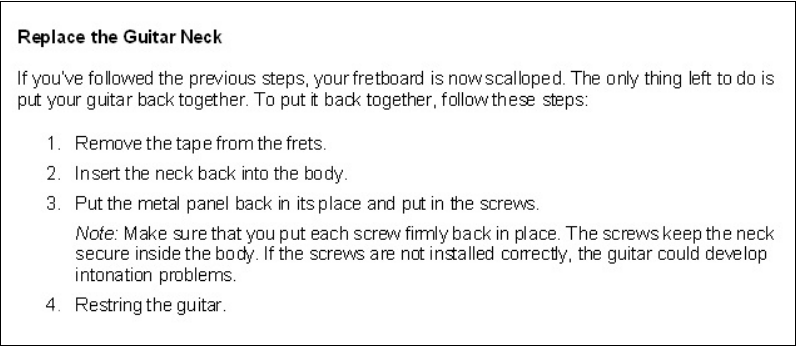
- There are at least two techniques to avoid this problem: you can split the instruction from the supplement into separate paragraphs; or you can bold the instruction. The example below shows you a possible technique for including supplementary discussion so that it doesn’t obscure the instructions.
Bolding actual user steps in instructions. Bold text helps distinguish the actual action from the supplementary information.
Adapted from of two chapters: “Chapter 4 Technical Documents” of ENGL 145: Technical and Report Writing, 2017, used according to Creative Commons licensing CC-BY-4.0 and “7. Writing Instructions” from Sexy Technical Communications, 2016, written by David McMurray and Jonathan Arnett can be found at https://digitalcommons.kennesaw.edu/oertechcomm/7 and is used according to Creative Commons licensing CC-BY-4.0
The Value of Graphics and Visual Instructions
Graphics and Images in Instructions
Probably more so than in any other form of writing (except maybe for comic books), graphics are crucial to instructions. Sometimes words simply cannot explain the step. Illustrations are often critical to readers’ ability to visualize what they are supposed to do. Consider the example of car repair manuals which actually use photographs to illustrate procedures, or screen shots that demonstrate the process of using software.
In a technical writing course, an instruction assignment may require you to include illustrations or other kinds of graphics—whatever choice would normally be used in an instruction manual. You want to be sure that the graphics you choose are appropriate and are placed in close proximity to the steps they illustrate. Don’t make your audience flip pages to see the accompanying graphic.
If you find graphics or images in other sources, be sure that you cite the source, preferably right below the graphic. Here are some of the options for using graphics and other strategies to enhance the readability and success of your instructions.
Headings. In your instructions, make good use of headings. Normally, you’d want headings for any background section you might have, the equipment and supplies section, a general heading for the actual instructions section, and subheadings for the individual tasks or phases within that section. Headings are an easy and effective way to help your reader navigate the document.
Lists. Similarly, instructions typically make heavy use of lists, particularly numbered vertical lists for the actual step-by-step explanations. Simple vertical lists or two-column lists are usually good for the equipment and supplies section. In-sentence lists are good whenever you give an overview of ideas to come.
Special notices. In instructions, you must alert readers to possible actions that could result in damage to their equipment, wasted supplies, failed procedures, or injury to themselves or others—even seriously or fatally. Companies have been sued for lack of these special notices, for poorly written special notices, or for special notices that were out of place. See special notices for a complete discussion of the proper use of these special notices as well as their format and placement within instructions.
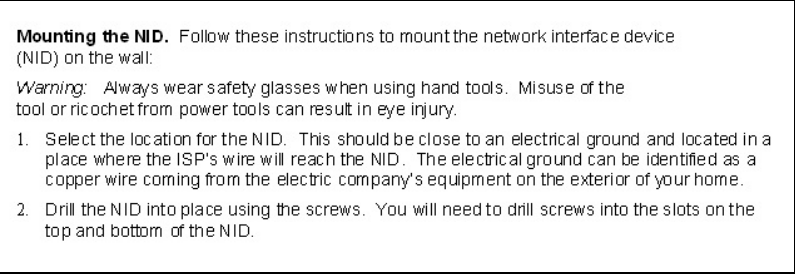
Indentation of notices in instructions. In the first example, notice how the notice is indented to the text of the preceding step. In the second example, notice that the severe notice is placed at the beginning before any of the steps.
Number, abbreviations, and symbols. Instructions also use plenty of numbers, abbreviations, and symbols. Be sure you are using them correctly. Remember if your instructions pertain to a brand name product to use trademark symbols appropriately.
Adapted from McMurray, David and Arnett, Jonathan, “7. Writing Instructions” from Sexy Technical Communications, 2016, written by David McMurray and Jonathan Arnett can be found at https://digitalcommons.kennesaw.edu/oertechcomm/7 and is used according to Creative Commons licensing CC-BY-4.0
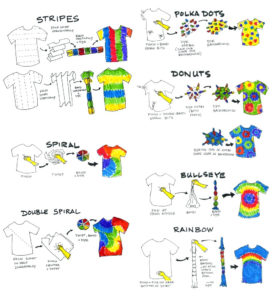
Visual Instructions
Visual instructions may or may not include text. Generally, it is good to have both being that there are different learning styles. However, it can often vary depending on the intended use of the instructions. Visual instructions serve to clarify a concept that is difficult to explain using only words. Graphics may be used to show how something looks, how something should look once the step has been completed, how something is done or constructed, show trends or relationships, add liveliness to the project or simply organize information. Graphics are useful since almost everyone (including children and others of a different language) can understand visual instructions. It also eliminates the cost of having to translate and print text instructions in multiple languages. Graphics are useful in instructions because people can see exactly what they need to complete.
Benefits of Visual Instructions in Business and Marketing:
- Minimize language barriers.
- Speeds up the learning curves.
- Minimize human variability.
- Increase instruction use rate and comprehension
- Reduce product returns.
- Decrease assembly time- increase customer satisfaction
- Ease technical support.
- Visualize and generalize data into understandable trends
- Increase integrity of reports and memos
- Promote professionalism
- Ensure universal understanding
Benefits of Visual Instructions in Academia:
- Make abstract ideas visible and concrete.
- Connect prior knowledge and new concepts.
- Provide structure for thinking, writing, discussing, analyzing, planning, and reporting.
- Focus thoughts and ideas, leading to understanding and interpretation.
- Help students to clarify thoughts, organize and analyze information, integrate new knowledge, and think critically.
Common Problems with Visual Instructions
While there are benefits of using purely visual instructions, there are also some drawbacks. When there are no words included people may interpret graphics differently. Some graphics can be unclear, and this can confuse the intended audience if the process is very detailed and requires pieces that look identical. When the pictures include many different piece it is also necessary to zoom in on difficult parts in order to see them better. Also, if each piece is not drawn to scale, then a circle could represent the top of a table or a washer. There are also certain graphics that not everyone understands. If you work in a field that employs specialized graphics, use these graphics only when communicating with readers in your field who will understand and expect them. If you are using the graphics for a wide audience (such as a board game that may be used for young children to senior citizens), make sure that the graphics you choose can be understood by all.
Instruction Revising Checklist
As you reread and revise your instructions, watch out for problems such as the following:
- Make sure you provide real instructions—explanations of how to build, operate, or repair something.
- Identify where the instructions will be used.
- Write a good introduction—in it, indicate the exact procedure to be explained, indicate audience requirements, and provide an overview of contents.
- Make sure that you use the various types of lists wherever appropriate. In particular, use numbered vertical lists for sequential steps.
- Use headings to mark off all the main sections and subheadings for subsections. (Remember that no heading “Introduction” is needed between the title and the first paragraph. Remember not to use first-level headings in this assignment; start with the second level.)
- Use special notices as appropriate.
- Make sure you use the style and format for all headings, lists, special notices, and graphics as specified by your teacher for instruction writing assignments.
- Use graphics to illustrate any key actions or objects, and make certain they are located right beside or beneath the step they illustrate and properly labeled.
- Provide additional supplementary explanation of the steps as necessary.
- Remember to create a section listing equipment and supplies, if necessary.
Some final thoughts about writing instructions…
As a technical or workplace writer, your ability to write good instructions carries a number of ethical implications. Keep in mind that poorly or carelessly designed instructions leave your or your company liable for damages. They also destroy your credibility and authority. Before you submit any instructions for final review, be sure you get other eyes on them. For small or routine procedures, it may be enough to have a coworker look them over, but more complex instructions should always be tested for usability. Make sure that you have read the chapter on Usability and carried out the necessary testing before your instructions go to publication and distribution.
Adapted from the following sources:
- “Module 5: Visuals” from Lumen Learning’s Technical Writing textbook.
- The Value of Visual Instructions. Provided by: WikiBooks. Located at: http://en.wikibooks.org/wiki/Professional_and_Technical_Writing/Instructions/Visuals#The_Value_of_Visual_Instructions Project: Professional and Technical Writing. License:CC BY-SA 3.0: Attribution-ShareAlike
- Image of Tye-Dye Instructions. Authored by: kelly. Located at: https://flic.kr/p/8C72Dm License: CC BY-SA 2.0: Attribution-ShareAlike
- “Revision Checklist” by McMurray, David and Arnett, Jonathan, “7. Writing Instructions” from Sexy Technical Communications. Sexy Technical Communications, 2016, written by David McMurray and Jonathan Arnett can be found at https://digitalcommons.kennesaw.edu/oertechcomm/7 and is used according to Creative Commons licensing CC-BY-4.0